
How to Host a Whisky Tasting Like a Pro
If you're a whisky lover then you've probably tasted many different styles of whisky, those from your own country, as well as whiskies from other countries.
If you're new to whisky, then a whisky tasting is a great way to try some new whiskies, and learn from others at a fun, engaging, social event.
My brother lives in Melbourne, Australia, and there is a cool whisky bar near his house that hosts weekly whisky tastings. He's told me about the different whiskies available to them, and how they are regularly able to taste whisky from all over the world. The staff there bring in new products every week.
Unfortunately, where I live, we do not have a cool whisky bar to go to for tastings. I've always enjoyed visiting distilleries when I travel, but there is nowhere nearby that hosts events regularly, so I created my own.
Once a month, give or take, I host a whisky tasting at my house with a few friends and family. Usually there’s a theme. Each of us brings a bottle to share, then takes their bottle home at the end of the evening. Below, I’ll go through the way I set up and conduct a whisky tasting at home.
Planning a Whisky Tasting at Home
Planning any event takes some effort to make sure it goes off without a hitch, and hosting a whisky tasting at home is no different. You’ll want to make sure it goes smoothly so a little planning is in order.
Select a Date and Time
Select a date and time that makes it easy for people to attend, evening is usually best. If you are going to be hosting regularly, consistency is very important. Your guests will be able to attend regularly if the whisky tasting is held on the same day and at the same time each month. I host my tastings monthly, on the last Saturday of the month, at 7:30 pm.
That being said, life happens, things come up so the tastings do not happen every month. I’ll cancel if not enough people can make it, or if the Saturday happens to fall on a long weekend where people are away. Christmas holidays are not a good time either, with office Christmas parties, and people traveling between Christmas and New Year’s. Besides, we host a Christmas cocktail party as well, so a whisky tasting around the same time gets to be too much
Create a Guest List
I have a regular crew that comes most months, as long as there isn’t something that gets in the way. There are 6 regulars, including myself, plus one from out of town who comes when he can. Some people have brought the occasional guest as well.
I’m hesitant to invite more because any more than 8 would become unwieldy. Not just because of space constraints, but because of the way we do the tastings, everyone brings a whisky to share, even 8 different whiskies at a tasting would be too many.
So far, the most we’ve ever had is 6, and the fewest is 3. 3 is not really enough people so we agreed that going forward the minimum would be 4.
I’ve heard of people hosting more people, but they do it where the host location changes each month, with the host responsible for selecting the whiskies. You could host more people that way. The host would be responsible for selecting 4 to 6 whiskies for the tasting they are hosting.
I’m not sure how payment would be handled. Perhaps the host pays, or everyone chips in some cash for the evening. Another issue would be glassware for that many people. Perhaps each guest brings their own glasses.
Select the Whiskies
Beyond the social aspect of an evening tasting whisky, the main benefit is to try different whiskies that you have not been exposed to before. If you’re going to spend money on an expensive bottle, it’s good to know that you’re going to enjoy that bottle before you buy it. I’ve purchased bottles, and I’m currently looking for bottles, that other people have brought to tastings, that I enjoyed, and would not have purchased if I had not been able to try them first.
However you choose the whiskies to bring, try to limit the number to 4 to 6. Any more and you may start to lose the ability to differentiate between the different spirits. After a while the aromas will start to blend together, and your olfactory senses start to dull after a lengthy exposure to the scent of whisky in a closed space for a long period of time.
Choose a Theme
Try to have a focus for each evening. That way you are able to compare similar whiskies from the same region of the world to gain a greater appreciation for a particular style of whisky.
So far, we’ve done Scotch whisky (Highland, Lowland, and Speyside), bourbon, Canadian whisky, Irish whiskey, and even tequila, just to change things up. We’ve thrown in a few general evenings as well including a Scotch night (any category) and world whisky, which basically means bring whatever you like, from anywhere in the world.
As mentioned above, each person brings a bottle, so we’ve had anywhere from 3 to 6 whiskies in an evening, which is a good range.
The selection you have available to you will vary greatly depending on where you live. You could select whiskies available locally, from boutique stores, or from online sources if you have that available to you.
Keep a Budget in Mind
We have not discussed a budget in my group, but you may want to. Not everyone has the same disposable income to spend on something like whisky, so you may want to set a cap on the price per bottle.
Required Tasting Materials
These are a few of the things you’ll need to host your own whisky tasting at home:
- Whisky tasting glasses
- Small water bottles with droppers
- Bottle pourers
- Water
- Palate cleanser
- Notepads, or whisky score sheets
The Right Glassware
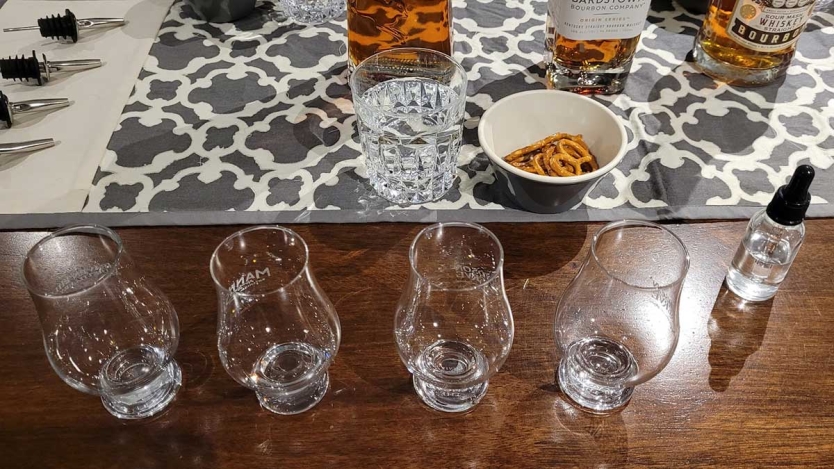
Yes, there is a “right” glassware for tasting whisky, and using the proper glassware will greatly enhance your whisky tasting experience. In order to fully enjoy the aromas, and taste all the flavour components in a whiskey you should use a tulip-shaped glass.
There are many tulip-shaped glasses available, but the most widely recognized, and the one you’ll find at whisky festivals and competitions around the world is the Glencairn glass (pronounced glen-kehrn).
A tulip-shaped glass offers some benefits over other glassware:
- Wide bowl: allows for the greatest appreciation of the colour of the whiskey, and the wide base exposes more of the surface of the whisky to the air, allowing the flavour to develop over time. This brings out more of the subtle flavour compounds in the whisky.
- Tapered mouth: helps hold the alcohols at the bottom, yet concentrates the aromas and allows them to escape, enabling you to detect more of the subtle scents, and different components of the whisky
You can find many styles of tulip-shaped glasses in addition to the traditional Glencairn glass, including stemless Glencairn style tulip-shaped glasses that don’t have the heavy base, stemmed tulip-shaped glasses, as well as luxury products such as the Norlan whisky glass. The Norlan whisky glass is a double-walled glass with a tulip-shaped interior and a more traditional rounded exterior that has all the advantages of the traditional Glencairn glass, but is more comfortable to hold and has a more high-end feel.
If you do not have tulip-shaped glasses available, any glass with a wide base and narrow mouth, such as a white wine glass will do, just be diligent with the size of the pour. You will be looking for a ½ ounce pour for each whisky at the most. This is not a drinking event. You and your guests are there to appreciate the whisky, not get drunk.
Water to Add to Whisky during Tasting
Provide several small bottles with droppers for people to add water, a few drops at a time, to their whisky during the tasting. Adding a few drops of water can break the surface tension on the whisky, releasing more aromas and flavour.
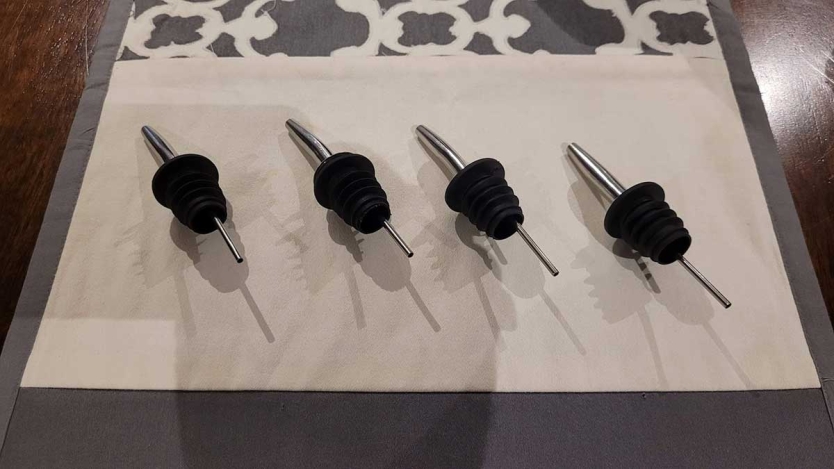
Bottle Pourers
I use a set of bottle pour spouts, also called bottle pourers, speed pourers, or liquor pourers, just to make it easier to control the quantity poured into each glass. You only want about a ½ ounce pour of each whisky.
Water and Palate Cleansers
It’s important to taste each whisky on its own, without the aromas and flavours of previous whiskies colouring the next one. That’s why you want to provide water, and a palate cleanser between each tasting.
The palate cleanser should be something fairly neutral tasting, such as crackers, or bread, in a small bowl for each guest. Noted author and whisky-tasting expert Jim Murray suggests drinking strong black coffee, or 90% cocoa as a palate cleanser. We haven’t tried cocoa, but we did drink coffee at one tasting. We didn’t find it was much different than crackers, but I encourage you to give coffee or cocoa a try. You may find you prefer one or the other.
Notepads for Tasting Notes
Depending on how serious your crowd is, you may want to provide notepads for your guests to record notes about each whisky, including nose, taste, finish, and possibly a score. For more serious collectors, this gives them something to refer back to when shopping for something they tasted at a tasting.
This is not something our group was interested in, but it is something you may want to explore. You can find downloadable note cards, and scorecards online.
Recently, I even crafted my own whisky tasting flight boards from old whisky barrels to make the whisky tasting more authentic to what you might experience at a distillery. You can find whisky barrel staves online, or you may be able to get an old whisky barrel from your local distillery.
Set up the Whisky Tasting
Arrange the Space
Set up a comfortable seating area, away from distractions such as a TV, or a noisy kitchen with scents from dinner that may interfere with your ability to detect subtle scents and flavour compounds in the whisky. This means that the kitchen table after dinner where you just had a garlic-heavy meal would not be the ideal location.
You also want to encourage interaction between your guests. This is a social event after all, so everyone sitting in a row, beside each other at a bar may not be as desirable as everyone sitting around a table, or a group of tables.
It’s also a good idea to advise your guests to not wear any cologne, or perfume, and to wash their hands before the tasting, so there are no other scents to cloud their senses.
Organize and Pour the Whiskies
You’ll want to arrange whiskies in the order they will be tasted, from light to strong flavors. Generally, this means you will taste the lowest proof whiskies first, and highest proof whiskies last. Or, if you have some heavily peated whiskies, and some that are not so smoky, or heavily peated, you will taste the more lightly peated and smoked whiskies first, followed by the smokier, more heavily peated whiskies.

We set the bottles on the table, arranged lightest to strongest, then pour all the whiskies before tasting begins. That way the flavours have a chance to develop in the glass, and some of the alcohol has a chance to evaporate, making it easier to detect all the scents on the nose, and the subtle flavour components that may be masked by higher proof whiskies.
Conduct the Tasting
If this is your first event, greet your guests, and thank them for coming. Give a brief rundown on how the tasting will go, and what to expect. If your guests have not been to a tasting before, or if they are new to whisky, you will want to talk about the whiskies being tasted, where they come from, some of the characteristics of whisky from that part of the world, and what makes them unique.
Guide Your Guests Through the Tasting Process
Some of your guests may have been to many whisky tastings, either at special events, or at a distillery, but that may not be true for every guest. Even if some guests have been to a whisky tasting before, it may have been a long time ago, or whoever conducted the tasting may have done so in an unconventional way, so it is a good idea to start by guiding your guests through the whisky tasting process. You want everyone appreciating each whisky, together, at the same time, rather than each guest doing their own thing.
Two things I think are important to mention:
- Encourage your guests to participate and contribute to the conversation. Tell stories of distilleries they’ve done tastings at. Discuss their impressions of each whisky at each step of the tasting process. This is a social event, not a lecture.
- Not everyone will detect the same scents and flavour notes, and that’s ok. Everyone is different and some people will be able to detect many more individual aromas and flavours than others. What one person perceives as the taste of cherry, someone else may perceive as plums. There’s no right or wrong. This is a very subjective experience and not everyone will detect the same things in the same way. What’s important is what you perceive, and whether the whisky is one you enjoy, or not, and have fun doing it.
Before we begin, have a sip of water to cleanse the palate.
Step 1: Examine the Appearance of the Whisky
Start with examining the appearance of the whisky. Look at the clarity, and colour. Is it as light straw color, or darker amber? Younger whiskies tend to be lighter, while older whiskies that have spent more time in the barrel, and higher proof whiskies, will usually be darker.
The barrel will affect the colour as well. Whisky aged in new oak barrels will not be as dark. Whisky aged in ex-bourbon will be more gold, and those aged in sherry casks will have a darker mahogany colour. However, the more often a cask is refilled, the less colour is imparted to the whisky.
Like wine, whisky has legs. Swirl the whisky in the glass and look for the streaks, or legs, sometimes called tears, remaining on the walls of the glass. This is caused by the Marangoni Effect, which describes how the flow of liquid is affected by surface tension. As alcohol evaporates, the liquid on the surface of the glass becomes less alcoholic, resulting in a liquid with a higher concentration of water, which is heavier and has higher surface tension than alcohol. A higher water content will pull the liquid back down into the glass quickly. The thicker the legs, and the longer they take to flow back down into the glass, the higher the alcohol content of the whisky. The legs will also give you an idea of what sort of “mouthfeel” to expect.
Step 2: Nose the Whisky
This is one of the most important steps in the whisky tasting process because your sense of smell is stronger than your sense of taste, and capable of detecting billions of scents. Tasting whisky is not like tasting wine, do not nose directly into the top of the glass. The high alcohol content may overwhelm your senses and dull your ability to pick out the more subtle scents.
Start by placing a hand over the glass to help warm the whiskey to bring out the more subtle aromas and flavours.
Sniff at the top of the glass with your mouth slightly open, but don’t stick your nose into the glass. Some people sniff on each side of the glass to sample the aromas in each side of the nose independently. Look for fruity and floral aromas. You may notice spice, oak, vanilla, and caramel.
Take your time. Sample the aromas multiple times. Move the glass away from your nose to let in more air. Look for additional aromas that may become more detectable over time such as the grains used, or yeast. Additional aromas may include smoke, peat, and the scents of not just fruity notes, but also the scents of specific fruits.
Step 3: Taste the Whisky
This is the moment you’ve been waiting for – that first sip. Take a small sip, and allow the whisky to coat your mouth, but take no notice because this first taste might be coloured by any other flavours lingering in your mouth from dinner, or something else you ate.
Take a second, larger sip. Chew the whiskey, swirling it around your mouth so all areas of your tongue are exposed. Open your mouth slightly to allow air in, and alcohol out, and take note of the different flavours.
Notice how the whisky feels in your mouth. Is it oily, or clean and light? Does it coat your mouth like syrup?
Do the flavours linger pleasantly in your mouth for a long time, or is the finish short? Do the flavours change over time from that first sip, as you hold the whiskey in your mouth, and throughout the finish? Is the whiskey simple, or complex, with well-balanced flavours that work well together, or is the whisky overpowered by one or more flavour notes such as oak, smoke, peat, or sugar?
Taste the whiskey again and compare it to the last sip. Many people will add a drop or 2 of water to help open up the flavours. How does the flavour compare after adding water?
It’s a good idea to leave a little of each whisky in the glass so you can circle back to it at the end, after trying each whisky in the evening’s selection.
Move on to the next whisky until you have gone through each one. If you find your senses are starting to dull, take a break, and move to fresh air for a few minutes to refresh your senses.
For more information, see How to Taste Whisky: "The Murray Method".
Conclude the Tasting
Have Everyone Choose Their Favourite Whisky of the Evening
We always go around the table at the end of the night and have everyone choose their favourite whisky, and/or rank the whiskies in order of preference. It’s interesting to see how different some people’s preferences are. You may have everyone choose the same whisky as their favourite, but other nights is might be all over the place.
As I mentioned above, there’s no right or wrong. Everyone’s palate is different. Not only do people prefer different types of whisky, everyone’s taste and perception during the tasting will be different, with different people tasting different flavour compounds than other people. So much so that you will have someone rate a particular bottle as their favourite, and some else rate that same bottle last.
Prepare for the Next Tasting
The last thing we do is choose the style of whisky for the next tasting. It’s ok to choose a style you’ve already covered, as long as everyone brings different whiskies next time.
Be sure to thank your guests for coming. Hopefully, they had a good time, and learned something along the way. You could ask for feedback to improve future tastings, and let everyone know when the next tasting will be.


Comments
Be the first to leave a comment.